Overclocking – From Processors to RAM to Graphics Cards
Maybe your computer is old and outdated and just can’t squeeze the latest games in even on low quality and you don’t have the money to upgrade or maybe you’re a rabid gamer who wants the best performance on the newest games, it doesn’t matter. You could even be bored and want to do something “exciting” and “extreme” or other. Whatever the reason, overclocking is most definitely the way to go.
The primary thing to consider is whether or not your computer supports CPU/RAM/AGP overclocking. You probably already know the answer if you built your own, which is mostly a yes. If you have a computer like a Dell or Gateway or other main retail brands, you can mostly forget about overclocking. Generally, you will get the best bang for your buck with custom built machines. Don’t worry, if you cannot overclock your CPU or RAM, your graphics card is most likely still eligible.
There is a large range of differences per manufacturer, so bear with me and don’t fret if there are minor anomalies to what I say, as I am mostly accustomed to Abit motherboards, Intel processors (meaning Abit Intel motherboards), and ATI graphics cards.
Before attempting an overclock, please note that once you overclock, you void your warranty on most processors, RAM, and graphics cards. Temperature monitors are extremely helpful, as you know when you have gone too far.
As for cooling methods, Thermaltake makes great copper heatsinks (I have a Spark 7+ Xaser Edition for my Pentium 4; semi-loud, not bad). Arctic Silver 5 is about the best thermal grease out there. Buy a large tube, as you need quite a bit for all of your needs (northbridge, CPU, graphics card, and anything else you wish to put a heatsink on). For GPUs (graphics processing unit), you want an ATI/NVIDIA Silencer (make sure to buy the one for your card and made by Arctic Cooling), which is not only extremely silent, but most push all air directly out the back of the computer and cools the card’s RAM, which most stock cooling doesn’t do. The northbridge cooler is usually sufficient, but if it isn’t, there isn’t really a wide variety avalable, so just pick one out or remount the one you have with the Arctic Silver 5 paste. All of this will cost you a nice bundle, but is well worth it.
Kicking off with overclocking your CPU, RAM, and AGP bus, you will want to get into your BIOS menu (if you don’t know how, you probably need to ask a tech-savvy person to attempt this for you or just press either F2 or Delete. Usually, there will be a message telling you which key to press.). Keeping in mind that the directions are generalized, you will need to find a menu that looks similar to the one below, most likely the label containing the words “soft” or “CPU” or other related words dealing with the subject.
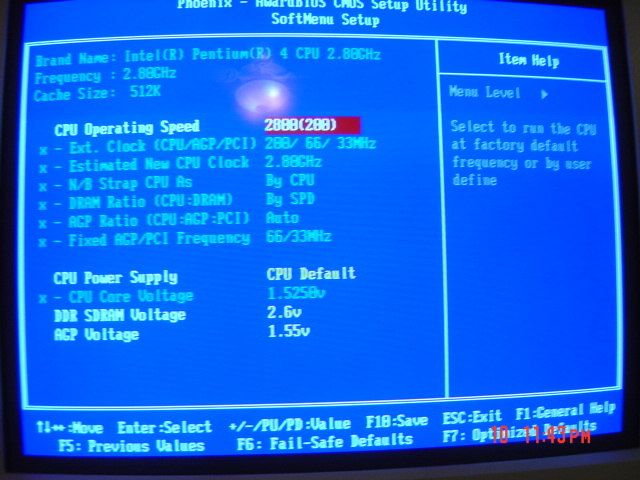
Once you find the screen, set the CPU Operating Speed to “User Defined.”
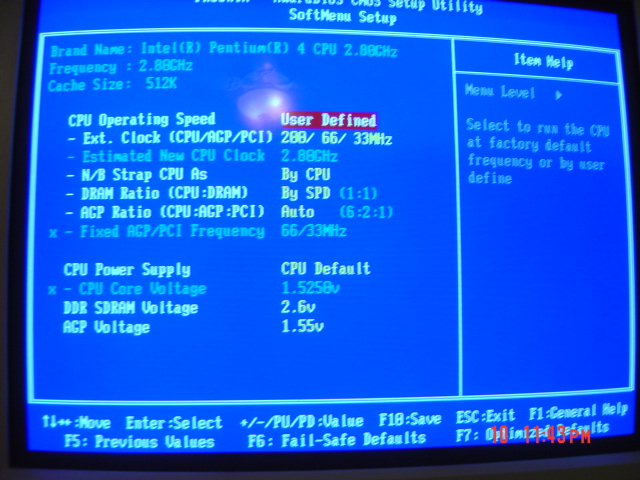
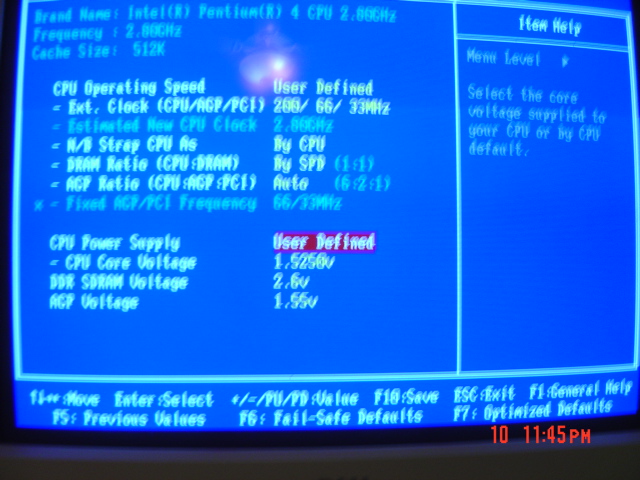
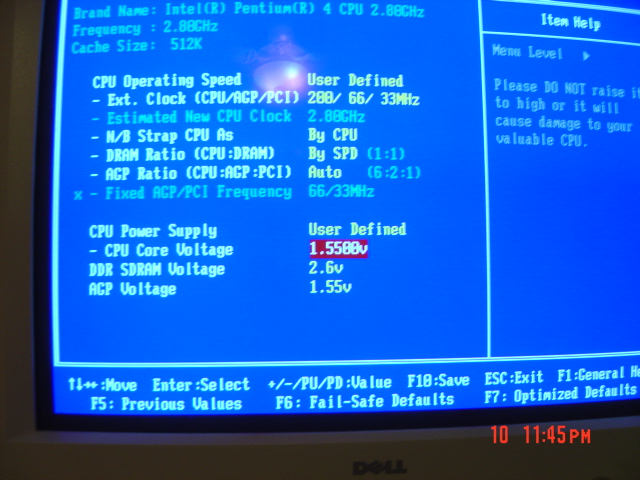
Next, adjust the clock to your liking. Don’t touch any of the ratios unless you know what you are doing. This overclocks your AGP bus, CPU speed, and RAM all at the same time, according to the ratio specified. Below, you can see the estimated CPU clock change when you step up the speed. Some BIOSes and processors have the ability to change the multiplier directly, use it wisely. An unrealistic example is that a 100MHz processor might be 20MHz core with a multiplier of 5. 20*5=100. Take caution in overclocking, as you do not want to go too far with it as being unstable. Raise the clock one notch at a time and make sure it boots at the least, every once in a while, use a tool to test stability. I suggest memtest 86 to test your RAM stability, compiling for CPU, and ATITool or RivaTuner for your AGP bus. Raising the clock without touching the voltage, depending on your chip and cooling, should take you fairly far, while not raising temperatures dramatically. After you can no longer keep it stable at default voltages, proceed to set the power supply to User Defined, using extreme caution, as this can easily damage your chip, or leave it as it is if you are uncomfortable. Make sure it boots stable after adjusting the voltage and ensure that your temperatures are not near dangerous levels. Continue to raise the clocks one step at a time, but me much more careful. Continuing to raise voltages is extremely dangerous and should only be done if you really do know what you’re getting into.
Once you find a good, stable speed, set it back a notch or two just to be safe. The overclocking process can last for quite a while, but be safe in the beginning so that later on, when overclocking the GPU, you don’t get crashes from the CPU and mistake them for GPU crashes. Later on, you may fine tune it if you so choose.
Now that you have finished overclocking the RAM, CPU, and AGP bus, we can proceed to the graphics card. Some cards can gain by leaps and bounds (usually the base models without any extra names. E.g. 5600 or 9600), while others gain in tiny strides (5600 GT, 9600 XT). If you have a base card, chances are high that you can flash it to another level and keep it stable. Before doing that, however, we must overclock using software. RivaTuner users, please follow as closely as possible, as my NVIDIA card is currently “abroad” and I may revise this to help you out later. Note that NVIDIA users may use ATITool and ATI users may use RivaTuner.
Personally, I was able to gain about 20MHz core from my X800 XT PE with stock cooling, but I have not tried with my new ATI Silencer 4.
There are two types of clocks when looking at your graphics card. First, there is the memory clock, which is simply RAM and is what will perk up those frames per second the most. Lastly, there is the core speed, which is simply the processing unit for the card. In the future, also expect to have physics calculators built in to your graphics card.
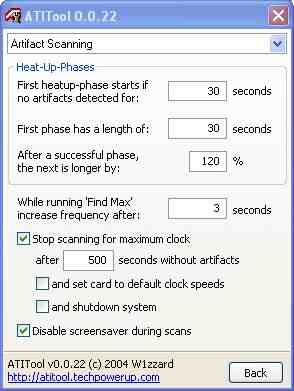
ATITool makes overclocking easy with just a few setting adjustments. Depending on what card you have, you can easily set it to find your clock fast and easily. Basically, ATITool raises the clock slowly with a rendering window open searching for artifacts as the clock rises. Artifacts are errors by the graphics card caused when it’s running too fast or too hot. After installing, head over to the options and set your fan (if applicable) to run at the speeds you wish. Enter under the “Artifact Scanning” tab something like the picture below. Please also take heed to any warnings received on startup. For instance, mine warns me to turn off temporal anti-aliasing, as it says that it will cause artifacts for the tests and I will not reach my full overclocking potential with it enabled (can enable after finding clocks).
Next, you want to fine tune any other options that may be of use to you and then go back to the main view. Personally, I always begin by overclocking the core first. So, click “find max core” and let it do its job. If you set up the menu as I have, it should find a good, stable core within 30 minutes or so. You will notice that it uses a heat-up phase to warm the card up. You may click either the left or right mouse buttons to shorten or lengthen the phase to your content. Once you find your maximum core (with your current heating and so on), write the number down, set to default, and find the maximum memory. Once you find that, set them both to your overclocked speeds, find the core using the button again, but this time preserving settings and then finding the memory again. After you finish all that, note your clocks (you can save a profile to load if you wish) and check out the BIOS page.
I recommend only attempting to flash your BIOS if your card is able to make it to the clocks specified on the page (make sure to download the correct one) or specified by you using the “advanced” link on some of them. I also warn that it is best to have a PCI card handy in the event that your other card will not boot on reboot, this way, you run off the PCI card and re-flash your card. Be careful not to download the wrong BIOS or download one with the clocks being too high. The X800 PRO can also be flashed to unlock four more pipelines as well as a very large overclock.
A great guide to flashing your graphics card’s bios may be found here at TechPowerUp.
If, after following this guide, you are unsatisfied with your results, water cooling is always the best solution for the best clocks, though it is on the expensive side. Before you go with that, however, just remount everything by removing all paste and applying a thin-ish layer of Arctic Silver 5. Enjoy!


